How to Refill Brother Toner Cartridges & Reset Printer Toner, Drum, & Counter
Learn how to refill Brother toner cartridges, reset printer toner, drum, and counter with our easy-to-follow steps guide. Save money on printer maintenance and keep your Brother printer in top condition!
Praveen Kumar - Canon Printer Specialist
12/17/20248 min read
Are you tired of running out of toner in your Brother printer and facing the high cost of replacements? Do you find yourself stuck when your printer’s toner, drum, or counter needs a reset, leaving you frustrated and unsure how to proceed? You’re not alone—many Brother printer users face these common issues. However, there’s good news: you don’t need to rely on expensive technician visits or new supplies every time your toner or printer components need attention.
In this guide, we’ll walk you through the step-by-step process to refill Brother toner cartridges, reset the toner, reset the drum, and reset your printer counter. With these simple instructions, you can not only save money but also keep your printer running smoothly for longer. Whether you're looking to refill toner or troubleshoot common printer problems, we have the solutions for you. Let’s dive into each process and make printer maintenance a breeze!
How to Refill Brother Toner Cartridges (Step by Step)
Refilling your Brother toner cartridge might seem like a daunting task, but it’s simpler than you think. Refilling your toner can save you a considerable amount of money, especially if you regularly print high volumes. In this section, we’ll guide you through the process of refilling a Brother toner cartridge step by step.
Tools and Materials Needed:
Before you begin, make sure you have the following materials:
Refill toner powder (specific to your Brother model)
Toner funnel (optional but useful)
Toner refill kit (often includes all necessary tools like gloves and instructions)
Screwdriver (if needed to open the cartridge)
Paper towels (for cleaning up spills)
Tape or adhesive (to seal the cartridge after refilling)
Step 1: Prepare the Cartridge
Start by placing the cartridge on a flat surface, such as a workbench or table, where you can work comfortably. It’s also a good idea to lay down some paper towels or old newspapers to catch any toner powder that may spill.
Next, remove the toner cartridge from the printer. Depending on your printer model, you may need to open the front cover and pull the cartridge out gently.
Step 2: Open the Toner Cartridge
Locate the refill hole or opening on your toner cartridge. Most Brother toner cartridges come with a small, rubber plug that covers the refill hole. You can use a screwdriver or small tool to remove this plug. In some cases, you might need to carefully puncture the hole using a pin or sharp object.
If you don't see the refill hole easily, check the manufacturer's guide for your specific Brother model, as it might be in a slightly different location.
Step 3: Add the Toner
Once you’ve opened the refill hole, it’s time to add the toner powder. If you purchased a refill kit, it should come with a toner funnel that helps you pour the powder in without making a mess. Carefully pour the toner into the cartridge, ensuring you don’t overfill it. The cartridge can usually hold a specific amount of toner, so make sure you don’t exceed that limit.
Be cautious, as toner powder can be messy. Try to keep it inside the cartridge and avoid inhaling any particles.
Step 4: Seal the Cartridge
Once you've added the toner, use tape or the plug from your refill kit to seal the refill hole securely. This will prevent toner from spilling out when you handle the cartridge. Make sure the seal is tight and secure to avoid any leaks.
Step 5: Test the Refilled Toner Cartridge
After sealing the cartridge, it’s time to test it. Reinstall the toner cartridge back into the printer, ensuring it’s inserted properly. Print a test page for testing. Check the print quality—if it looks clear and sharp, your refill was successful.
If the quality is poor, try cleaning the cartridge and toner drum or consider refilling the cartridge again. In some cases, the toner might not have been evenly distributed.
How to Reset Brother Printer Toner (Step by Step)
After refilling your Brother toner cartridge, it’s essential to reset the toner in your printer so that it recognizes the new toner level. If your printer continues to display a "low toner" or "replace toner" message after refilling, this step will help clear that error.
Step 1: Turn Off the Printer
Start by turning off your Brother printer. Unplug it from the power source to ensure your safety and prevent any damage while resetting the toner.
Step 2: Open the Printer's Front Cover
Next, open the front cover of your Brother printer. This is where you can access the toner and drum units. Some models may have a slightly different way to open, so check your printer's manual if you're not sure.
Step 3: Remove the Toner Cartridge
Gently remove the toner cartridge from the printer. Make sure you handle it carefully, as toner cartridges can be sensitive. Set the cartridge aside for a moment.
Step 4: Press and Hold the Reset Button
Most Brother printers come with a reset button or sequence of buttons that you need to press to reset the toner. For many models, you’ll need to press and hold the "Go" button (for older models) or a similar button on the printer’s control panel. Hold it down for about 5-10 seconds until the printer’s lights flash or the screen displays a reset message.
Step 5: Reinstall the Toner and Close the Printer
After resetting, reinstall the toner cartridge back into the printer. Close the printer's front cover and power it back on. Your Brother printer should now recognize the refilled toner, and the “replace toner” message should disappear.
Step 6: Verify the Toner Reset
Once the printer is powered on, you can verify if the reset was successful by printing a test page. The toner level should now show as full, and the printer should work normally.
How to Reset Brother Printer Drum (Step by Step)
If your Brother printer displays a "replace drum" error, resetting the drum can often fix the issue. Here’s how to do it.
Step 1: Turn Off the Printer
Start by turning off your Brother printer and unplugging it from the electrical outlet. This ensures your safety during the reset process.
Step 2: Open the Printer's Front Cover
Open the front cover of your printer to reach the toner cartridge and drum unit. Be careful, as the drum unit can sometimes be delicate.
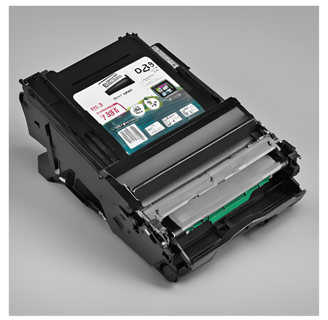
Step 3: Remove the Drum Unit and Toner Cartridge
Remove both the drum unit and toner cartridge from the printer. You’ll likely need to remove the toner cartridge from the drum to perform the reset.
Step 4: Press and Hold the Drum Reset Button
On the printer’s control panel, you’ll need to find and press the "Go" or "Drum Reset" button. For most Brother models, press and hold this button for around 5-10 seconds until the printer’s lights begin to flash or the screen shows a reset message.
Step 5: Reinstall the Drum and Toner Cartridge
Once the reset is complete, reinstall the drum unit and toner cartridge back into the printer. Be sure to seat them properly in their designated slots.
Step 6: Test the Printer
After reinstalling the drum and toner, close the front cover and power the printer back on. Print a test page to verify that the drum reset was successful and that the error message no longer appears.
How to Reset Brother Printer Counter (Step by Step)
Resetting your printer counter can be necessary after a certain number of prints or if you’ve just changed out the drum or toner. Here’s how to reset it.
Step 1: Turn Off the Printer
First, make sure the printer is turn off for this process.
Step 2: Open the Printer’s Front Cover
Open the front cover to access the toner and drum components.
Step 3: Press and Hold the Reset Button
To reset the counter, press and hold the "Go" button on your printer's control panel. You’ll need to hold it for about 10-15 seconds. In some models, you may need to press multiple buttons simultaneously, so consult your user manual for specific instructions.
Step 4: Release the Button and Close the Printer
Release the reset button once the printer’s lights flash or the screen indicates that the reset was successful. Close the front cover.
Step 5: Verify the Counter Reset
Power the printer back on and print a test page to verify the reset. If successful, the printer should no longer display the old counter data.
Conclusion
Refilling your Brother toner cartridge and performing simple resets for the toner, drum, and printer counter can save you money and keep your printer running efficiently. Regular maintenance and knowing how to handle these common issues will help you avoid costly repairs and replacements. By following the steps provided, you should have a hassle-free experience with your Brother printer.
Remember, if you're not comfortable performing these steps yourself, or if you encounter persistent issues, it’s always a good idea to consult the user manual or contact Brother customer support. Happy printing!
FAQs on Refilling Brother Toner Cartridges and Printer Resets
1. Can I refill my Brother toner cartridge myself?
Yes, you can refill your Brother toner cartridge yourself. It’s a cost-effective way to extend the life of your toner cartridges. However, ensure you follow the proper refilling process and use the right toner powder to avoid damage.
2. How do I reset the toner on my Brother printer after refilling?
To reset the toner on your Brother printer, open the front cover, remove the toner cartridge, and press and hold the reset button (often the "Go" button) for a few seconds. Reinstall the cartridge, and the printer should recognize the refilled toner.
3. My Brother printer is showing a "Replace Drum" error. What should I do?
If your Brother printer shows a "Replace Drum" error, you can reset the drum by pressing and holding the "Go" button for several seconds, then reinstalling the drum and toner cartridge. This should clear the error and get your printer back to working order.
4. Why is my Brother printer not printing even after refilling the toner?
If your Brother printer isn't printing after you’ve refilled the toner, it could be due to a few reasons:
The toner might not have been evenly distributed in the cartridge.
The toner cartridge or drum unit could be improperly installed.
The printer may need a reset to recognize the refilled toner.
5. How do I reset the Brother printer counter?
To reset the Brother printer counter, turn off the printer, open the front cover, and press and hold the "Go" button for 10-15 seconds. Release the button and close the cover. The printer counter should reset, and the error message will disappear.
6. Can I use third-party toner for my Brother printer?
While third-party toner can be cheaper, it’s important to use compatible toner that’s designed for your specific Brother model. Using low-quality or incompatible toner can cause poor print quality or even damage your printer.
7. How often should I refill my Brother toner cartridge?
Refilling your Brother toner cartridge depends on how much you print. If you print frequently, you may need to refill every few months. Be sure to check the toner level or print quality regularly to decide when a refill is necessary.
8. What should I do if my Brother printer still shows low toner after refilling?
If your Brother printer still shows low toner after refilling, you may need to reset the toner level in your printer. Follow the reset steps in your printer’s manual or consult the manufacturer for troubleshooting advice.
Insights
Explore the latest in printer technology and tips.
Resources
Support
contact@bestprintershop.com
+918920029543
© 2024 BestPrinterShop . All rights reserved.