How to Resolve Canon Printer Error Code B200 (P10)
Learn how to fix Canon printer error code B200 (P10) with easy-to-follow steps. Get your printer back to normal in no time.
Praveen Kumar - Canon Printer Specialist
1/30/20253 min read
What is Canon Printer Error Code B200 (P10)?
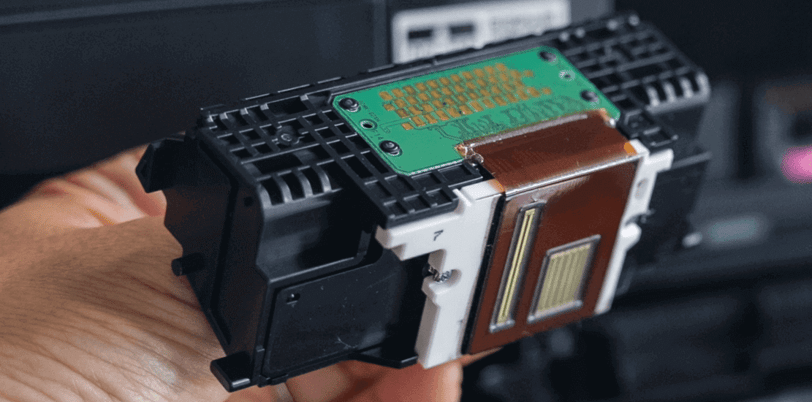
Error B200 is a critical printer issue that usually indicates a problem with the printhead. The printhead is responsible for distributing ink onto the paper, and if it malfunctions, the printer will stop working to prevent further damage.
Why Does Error B200 (P10) Occur?
Several factors can trigger Error B200, including:
Overheated Printhead: Excessive use without maintenance can cause overheating.
Clogged Nozzles: Ink residue can build up, leading to blockages.
Faulty Cartridges: Using low-quality or non-genuine ink cartridges may cause printhead issues.
Electrical Issues: Internal electrical failures within the printer can trigger the error.
Understanding the cause helps in applying the right fix effectively.
What Are the Possible Fixes?
Before attempting advanced solutions, try these quick troubleshooting steps: ✔ Restart the printer and let it cool down for 10–15 minutes.
✔ Ensure ink cartridges are correctly installed.
✔ Remove paper jams or any obstructions inside the printer.
✔ Update the printer drivers to the latest version.
If the error persists, follow the step-by-step guide below.
How to Fix Canon Printer Error Code B200 (P10)
Step 1: Power Cycle the Printer
Turn off the printer.
Wait for at least 10 minutes to allow it to reset.
Plug it back in and turn it on.
✅ If the error disappears, your printer was likely overheating.
Step 2: Clean the Printhead
Open the ink or output cover and remove the ink cartridges.
Carefully take out the printhead (refer to your printer manual if needed).
Clean the printhead using warm distilled water or an alcohol wipe.
Let it dry completely before reinstalling.
✅ Clogged printheads are a common cause of B200 errors.
Step 3: Replace the Ink Cartridges
Always use genuine Canon ink cartridges to prevent compatibility issues.
If you suspect a faulty cartridge, replace it with a new one and check if the error disappears.
✅ Third-party ink may cause errors or damage the printhead.
Step 4: Check for Paper Jams or Obstructions
Open the printer and inspect for any paper stuck inside.
Remove any visible debris carefully.
On/off the printer and check if the error is resolved.
✅ A minor obstruction can sometimes trigger major error codes.
Step 5: Perform a Factory Reset on the Printer
Press and hold the Stop/Reset button for 5–10 seconds.
Navigate to Settings > Reset and confirm the reset process.
Restart the printer and check for errors.
✅ A factory reset clears temporary glitches in the system.
Step 6: Update or Reinstall Printer Drivers
Head to Canon's official website to download the latest drivers for your printer model.
Uninstall the old drivers from your computer.
Install the latest drivers in your PC or laptop.
Step 7: Consider Replacing the Printhead (If Necessary)
If none of the above steps resolve the issue, it’s possible that the printhead is permanently damaged and may need to be replaced. Replacing the printhead can resolve the error, but it may be costly. Consider the age of your printer before investing in a new printhead.
✅ Check if replacing the printhead is cost-effective compared to getting a new printer.
Step 8: Contact Canon Support for Professional Assistance
If the error persists after trying all solutions, it’s best to reach out to Canon’s customer support or visit a service center. They can diagnose deeper hardware issues and provide professional repair solutions.
Preventing Canon Printer Error B200 (P10) in the Future
To avoid this error in the future, follow these maintenance tips: ✔ Regularly clean the printhead and nozzles.
✔ Use only genuine Canon ink cartridges.
✔ Avoid excessive printing to prevent overheating.
✔ Keep the printer firmware and drivers up to date.
✔ Turn off the printer when not in use to extend its lifespan.
Final Thoughts
Canon Printer Error Code B200 can be frustrating, but in most cases, it can be fixed with simple troubleshooting. By following this guide, you should be able to resolve the issue and get back to printing smoothly.
If you found this guide helpful, feel free to share it with others facing the same problem!
Need further assistance? Let us know in the comments, and we’ll be happy to help! 😊
Insights
Explore the latest in printer technology and tips.
Resources
Support
contact@bestprintershop.com
+918920029543
© 2024 BestPrinterShop . All rights reserved.