How to Replace an Empty Ink Cartridge
Printers are essential for printing documents, photos, and projects. Replacing an empty ink cartridge is a common task—this guide helps you do it correctly and efficiently.
Praveen Kumar - Canon Printer Specialist
12/5/20247 min read
Why Change Your Ink Cartridge
Your printer’s ink cartridge is like the heart of your printing system. It holds the liquid ink that creates text and pictures on paper. When this cartridge gets empty your printer can’t work properly. You will see faded prints, streaky lines and blurry text.
Knowing when to change your ink cartridge helps you get better print results every time. It also keeps your printer working longer and saves you money on repairs.
Clear Signs You Need a New Ink Cartridge
Your printer will give you several warning signs when the ink cartridge needs replacement:
Light or Faded Prints: When your documents look pale or uneven your ink is running low. This happens because there’s not enough ink left to create dark clear text.
Printer Warning Messages: Most modern printers have screens that show error messages. These messages will tell you exactly which cartridge needs changing.
Missing Colors: If you notice red, blue or yellow colors look wrong or disappear completely one of your color cartridges is empty.
Streaky Lines: When you see lines or gaps across your printed pages this usually means your ink cartridge is almost empty or has dried ink blocking the flow.
Knowing these signs helps you replace cartridges before they cause printing problems. Now let’s learn how to change them step by step.
Easy Step-by-Step Guide to Replace Your Ink Cartridge
Step 1: Get Your Printer Ready
Before you start changing the cartridge make sure your printer is safe to work with:
Turn On Your Printer: Plug in your printer and press the power button. Wait until the screen lights up and stops making noise.
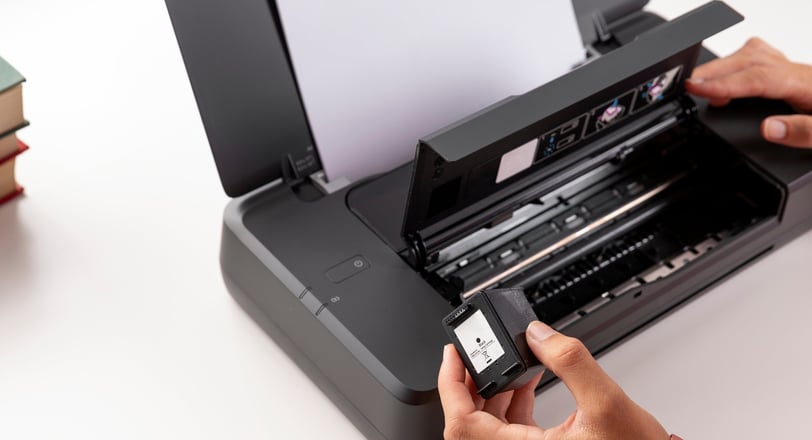
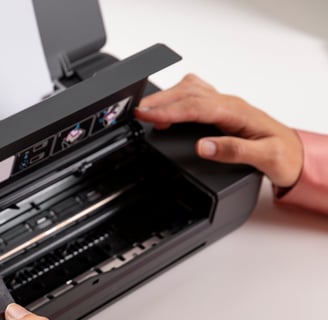
Open the Printer Cover: Look for the top or front cover of your printer. Lift it gently to see the ink cartridges inside. Some printers have a small tray that moves to the middle when you open the cover.
Wait for Movement to Stop: If the cartridge holder moves automatically wait until it stops completely before touching anything.
Step 2: Find the Empty Cartridge
Now you need to figure out which cartridge is empty:
Check the Screen: Look at your printer’s display screen. It will often show which cartridge is empty with a warning message or flashing light.
Look at Ink Levels: Many printers show ink levels on their screens or on your computer when you check printer settings.Feel the Weight: Empty cartridges feel much lighter than full ones. Gently lift each cartridge to compare the weight.
Step 3: Remove the Old Cartridge
Now you know which cartridge is empty you can take it out:
Unlock the Cartridge: Most cartridges have a small lever or button that holds them in place. Press or lift this to unlock the cartridge.
Pull Out Carefully: Hold the cartridge by its sides and pull it straight out. Don’t use too much force as this can break the cartridge or damage your printer.
Set It Aside Safely: Put the empty cartridge on a table where it won’t roll off. You’ll need to throw it away properly later.
Step 4: Prepare Your New Cartridge
Getting your new cartridge ready is important:
Check the Right Type: Make sure your new cartridge is for your printer model. The package should have your printer’s model number on it.
Remove All Packaging: Take off all plastic wrap, tape and protective covers. New cartridges have special tape over the ink holes that must be removed.
Don’t Touch the Metal Parts: Keep your fingers away from the small metal contacts and ink nozzles. Oil from your skin can block the ink flow.
Step 5: Put in the New Cartridge
Now you can install your new cartridge:
Line Up Correctly: Place the new cartridge in the right slot. Black ink usually goes on the left side and color cartridges on the right.
Push Until It Clicks: Gently push the cartridge down until you hear a clicking sound. This means it’s locked in place.
Close the Cover: Shut the printer cover completely. Make sure it clicks closed.
Step 6: Test Your Printer
After installing the new cartridge you should test:
Check for Error Messages: Look at your printer screen to see if there are no more warning messages about empty cartridges.
Print a Test Page: Most printers have a “Print Test Page” option in the menu. Use this to test the new cartridge.
Try Printing Something: Print a document or photo that uses different colors to see if all the ink flows properly.
If your prints still look bad your printer might need cleaning or the print heads might be clogged.
Step 7: Throw Away the Old Cartridge Properly
Don’t just throw empty cartridges in the trash:
Find Recycling Programs: Many stores that sell printers accept old cartridges for recycling. Some companies even give you money back when you return empty cartridges.
Check Manufacturer Programs: The company that made your cartridges might have a mail-in recycling program.
Help the Environment: Recycling cartridges keeps plastic and metal out of landfills and helps the environment.


Fixing Common Issues
Sometimes things don’t go as planned when changing cartridges. Here are solutions to common problems:
Problem 1: Printer Won’t Recognize New Cartridge
If your printer says the cartridge is missing or wrong:
Double Check Compatibility: Make sure you bought the right cartridge for your exact printer model.
Take Out and Put Back: Remove the cartridge and install it again, make sure it clicks in.
Restart Your Printer: Turn off your printer, unplug it for 30 seconds, then plug it back in and turn it on.
Problem 2: Ink Leaking from Cartridge
If you see ink spilling from the cartridge:
Check for Leftover Tape: Make sure you removed all the protective seals from the cartridge.
Handle with Care: Wear gloves if the cartridge is leaking and clean up ink immediately with paper towels.
Contact the Seller: If a new cartridge leaks right away it’s probably defective. Return it to the store for a replacement.
Problem 3: Poor Print Quality After Changing Cartridge
If your prints still look bad after installing a new cartridge:
Run Printer Cleaning: Go to your printer settings and run a “Clean Print Heads” cycle. This will clear out any dried ink blocking the nozzles.
Align the Print Heads: Some printers need you to run an “Align Print Heads” function after changing cartridges.
Wait for Ink to Settle: Sometimes new ink takes a few prints to flow through the system.
Tips to Get More Life from Your Cartridges
Follow these simple tips to get more life from your cartridges and keep your printer working:
Use Your Printer Regularly
Print Something Weekly: If you don’t print often ink can dry up and clog the nozzles. Try to print at least one page a week.
Keep Ink Moving: Regular use keeps ink flowing smoothly through the print heads.
Store Extra Cartridges Correctly
Keep Them Cool and Dry: Store unused cartridges in a cool dry place away from direct sunlight.
Store Upright: Store cartridges standing up the same way they sit in your printer.
Do Not Remove Until Ready: Leave cartridges in their original packaging until you need to use them.
Choose Good Paper and Settings
Use Good Paper: Cheap paper can cause ink to smudge and make prints look fuzzy.Choose Print Quality: Use “Draft” for everyday printing to save ink and “High Quality” only when you need perfect prints.
Match Paper Settings: Make sure your printer settings match the paper you are using.
Buy Cartridges
Stick with Brand Names: Original cartridges from your printer manufacturer work best and last longest.
Research Compatible Brands: If you buy third-party cartridges choose well known brands with good reviews.
Avoid Very Cheap Options: Very cheap cartridges often cause problems and can damage your printer.
Final Thoughts (Simplified and SEO-Friendly)
Replacing your ink cartridge is key to a happy printer. Follow the simple guide above and you’ll be printing sharp documents and colourful photos in no time.
Use the correct ink cartridge for your printer model. Be gentle with cartridges and recycle or dispose of old ones properly.
With a bit of practice changing cartridges becomes a breeze. Looking after your printer and ink will save you money in the long run.
When your printer is well looked after you’ll get great prints every time. Whether you print occasionally or daily this step by step ink cartridge guide will keep your printer in top shape and ready to produce professional results whenever you need them.
Frequently asked questions
Frequently Asked Questions About Ink Cartridges
1. How can I tell when my ink cartridge is empty?
Most printers will show a warning on the screen when the ink is running low or has run out. You might also see faded text, streaks, or colours not printing properly.
2. Can I use any ink cartridge in my printer?
No. Always use ink cartridges made for your specific printer model. Using the wrong cartridge can damage the printer or result in poor print quality.
3. How do I remove an ink cartridge from my printer?
Open the printer cover and find the ink cartridge holder. Gently press or lift the cartridge as shown in your printer manual, then pull it out carefully.
4. Should I turn off the printer before changing the cartridge?
It’s usually safer to turn off your printer first. This avoids accidents and makes sure the printer resets properly when the new cartridge is installed.
5. How do I put in a new ink cartridge?
Take the new cartridge out of the packaging, remove any protective tape or plastic, then insert it into the right slot. Press gently until it clicks into place.
6. What if my printer doesn’t recognise the new cartridge?
Double-check that it’s installed properly and that it’s the correct cartridge for your printer. Try turning the printer off and on. You can also clean the cartridge contacts or try a printer reset.
7. Can I refill an old cartridge instead of buying a new one?
Refilling is possible for some cartridges, but it's not always a good idea. It may cause leaks, print problems, or even void your printer warranty. Buying a new cartridge is usually safer.
8. How do I recycle empty ink cartridges?
Many shops and manufacturers offer ink cartridge recycling. You can drop off empty cartridges at collection points or send them back to the brand for eco-friendly disposal.
9. Why is the print quality still poor after I changed the cartridge?
Try running a cleaning cycle from your printer settings. Make sure the cartridge is properly installed and not faulty. You might also need to align the print heads.
10. How long does an ink cartridge last?
This depends on how much you print, your printer type, and the quality settings. Most ink cartridges last for a few hundred pages before needing replacement.
Insights
Explore the latest in printer technology and tips.
Resources
Support
contact@bestprintershop.com
+918920029543
© 2024 BestPrinterShop . All rights reserved.